Tuesday, December 20, 2011

Christmas cards!

So, as part of the season, everyone either buys or makes Christmas cards to send to family and loved ones.  Unfortunately, I was not one of them this year.  Don't ask why... but it just didn't happen.  However, I did make some cards to put gift cards in and to prep for next years Christmas card giveaways!

This year, I found some great ideas online and thought I would share some of the ones that I tried using my trusty Cricut!


This card has flocking instead of glitter.  It gives a nice fuzzy effect.

These cards I made using the card feature on my Winter Woodland cartridge.  If you have that cartridge it has a lot of great cards that you can easily make.  And I then added the glitter and flocking with packing tape on the reverse side of the cards!


This tag I created a Archiver's during one of their make and take weekends (which are tons of fun by the way!).  You can find the directions on how to make the tag here.  I added green and pearl gel pens on the candy's instead of red.  I thought it added a nice touch!
This is also another card I created using my Cricut Birthday Bash cartridge.  This cartridge is great because it has pre-holed banner triangles and several cards that you can make including some really cute birthday die-cuts!

Friday, December 2, 2011

Homemade Scrubs

As it is Christmas, and a Season for giving, I have decided to put together some really easy and affordable gifts that you can give to some of the special people in your children's lives.  This year was my daughter Isabelle's first year of school, which meant I needed to find a gift for her teacher.  I chose to try out my ability to make a homemade scrub.  I tried several but the one I liked the best was a Peppermint Sugar Scrub that I named "Candy Cane Scrub" in spirit of the season.  This project was inexpensive, but had a really great turnout and was so simple anyone can do.  I chose a jar that had a latch closure as I thought this would keep the scrub the freshest and intact within the jar.
These are the supplies that I used to create all of the scrubs that I attempted (minus the Starbucks... that one was for me)

Here is the recipe that I used for the Candy Cane Scrub:

4 tablespoons and 2 teaspoons of Granulated Sugar
2 teaspoons of Olive Oil
1 teaspoon of Flax Oil
3-5 drops of Peppermint Oil

Now, I used all Olive Oil and did not use the Flax Oil, but you can add any mixture of oils that you would like in addition to the Olive Oil.  

Here is my finished product!

I used my trusty Cricut to make a cute label for my jar and a ribbon and you have a cute affordable gift for anyone!  This particular jar of scrub cost me about $2.80 and $1.99 of that was the cost of my jar!  Thanks Tip Junkie!

Friday, November 25, 2011

Christmas Crafts!

Today is "Black Friday" and yes, I did participate in the madness.  However, I participated at 6am instead of Midnight like the rest of the crazies!  That being said I was able to squeeze in a couple of projects that I needed to complete as part of my holiday decorating.

First I completed decorating my $5 fresh balsam fir wreath that I purchased at Home Depot today.  A while ago at a craft show I bought an adorable large wooden candy cane that I thought would be perfect on a wreath.  And I also added some old bows that I have had literally forever, some LED lights and **POOF** I have an adorable wreath for all to enjoy!


Secondly I made a fabric shower curtain from some material I bought at 60% off at Jo-Ann's and some $1 ribbon.  It adds a really nice touch to my drab bathroom (which is in desperate need of an over-haul).


This shower curtain was super easy, with 4 yards of material and 1 spool of grosgrain ribbon.  All seams are measured at 1" and depending on how wide your shower is that would be the measurements for your ribbon placement.  Happy Holiday's everyone!

Monday, November 21, 2011

What old is new...

So, I know I haven't posted in FOREVER!  And I do apologize, but I have been busy with school, dance, and getting ready for the holidays!  But I did squeeze in a little time yesterday to finish a little project with my 10 yr. old.  Having three girls I am always interested in doing things a little different and since I was recently handed down a dresser from my Aunt I thought it would be a great opprotunity to give it a face-lift.  And since I was giving that dresser a face-lift I thought, why not give the other dresser a face-lift as well!  Here is what the two dresser's looked like before...
This was the hand-me-down dresser from my Aunt.  Still in good condition but desperately needed paint and new knobs.


This is an old dresser that was mine when I was a kid, and was in desperate need of a face-lift.

So yesterday on our trek to Home Depot, we picked up some Turquoise (Disney), Metallic Silver, and Silver glitter paint (both from Martha Stewart).  After a lot of hard work, new knobs, and several coats of paint, they girls both had brand new dressers!  The glitter paint had a really cool effect, but was hard to capture on camera.
This is the "new" hand me down dresser!  I think it turned out great!


I tried to get a close up to capture the glitter paint, but the picture does not do it justice.

Wednesday, October 12, 2011

Homemade Turkey & Noodles

So, last week I made my very first attempt at cooking a turkey.  It actually turned out great, and seeing as I bought the turkey around Christmas last year for less than $5 it has made a great meat for lunches!  Talking to my husband last night, he proclaimed he is tired of eating turkey sandwiches and asked if I would make turkey and noodles for dinner tonight.  Keeping in mind that I have NEVER made homemade noodles and really don't have any luck cooking them, this should be interesting!  Looking online I found a great Chicken and Noodles recipe at The Pioneer Woman.  She has a great website with full tutorials and recipes on how to make things and has really great ideas on home interior and general everyday life!

Here is the pictures of my final noodles, I probably should have cooked them a little longer but I thought they were delicious!

Tuesday, October 4, 2011

JELL-O Halloween Brain Mold

For this Halloween season JELL-O is offering a FREE Brain Mold for $2.95 shipped!  Get yours while supplies last because they are going fast.  These are great for a fun after school snack, halloween party, or just to creep out your kids!  Follow the link here and will take you directly there.

Monday, October 3, 2011

Halloween Wreath

So, I know some of you have seen those wreath's that are made of feathers.  And I refuse to pay $25 for one even though they are extremely cute.  I decided to make my own concoction of one and I think it turned out really well.  I might still add a bow to it, but I have yet to find some ribbon that I feel is worthy!  I did also add some purple Halloween lights to add some spookiness!


Wednesday, September 28, 2011

Hello!  Well over the weekend I was visiting my family in Alabama, and although I love visiting down there, I like being home.  While down south, my SUPER talented Mom made Isabelle some new clothes.  You can check her website out at Burps-n-Bows and she carries an array of children's and baby items for sale.

This is Peppa Pig, it's one of my daughter's favorite shows.

Also, I have been wanting to learn how to make the "hair poppies" that I see everyone wearing.  And FINALLY I found a tutorial online to teach me how to make them.  My first one turned out alright but I think my satin was too heavy.

But with the right material, I made two green flowers for my twin nieces.

I still have yet to finish the Halloween banner I started working on last week, but that is on my "to-done" list this week!

Wednesday, September 21, 2011

Two outta Three Ain't Bad...

Earlier this week I posted three projects that I had planned on finishing this week before the weekend.  Well, Wednesday is here and I have two already finished!  The first thing I finished was my very first knitting project which I was extremely excited about!
And, I have already started to work on my second dishcloth and have it almost half way done!
Now, the second project I wanted to finish was melting all of our broken crayons.  I finally finished these with the help of my 4 yr. old Isabelle (her favorite thing is to take the paper off the crayons).
This was a super easy project, all you do is take off all the paper on your crayons (Crayola works best), and I used some old mini muffin tins that I had but you really can use anything.  I have seen them where people have taken silicon molds in different shapes and wrapped them up with a new coloring book as a gift for a child.
Set your oven to 350 degrees and fill your tins with the broken pieces of crayons.  Stick them in the oven and keeping an eye on them, when they are all melted move them immediately from the oven to the freezer.  And... POOF!!  You have brand new crayons!

Monday, September 19, 2011

Apple Picking!

This is my absolute favorite time of year for several reasons!  The cooler weather for starters, considering I loathe Summer, all the fresh veggies you can get at Farmer's Market's, and apple picking!  This weekend I took Isabelle apple picking and we had a lot of fun!  And if you consider the cost savings you reap from picking your own it really adds up!  We picked a whole bushel of apples which is about 40 pounds.  We always visit Lynd's Fruit Farm in Pataskala, Ohio because they have great prices at $16 per half bushel we can't pass it up!

So get out there!  Take the family for a fun day out and pick some apples!

This week's projects...

This will be a short week for me as I am going out of town on a trip this weekend!  However, I still want to accomplish some projects that I have laying around.  First off is a Halloween banner that I purchased with the wooden pumpkin that I completed last week.  I have some great plans for these letters and am anxious to see the completed project!

Also, I have been saving all of our broken crayons from our gi-normous box of crayons that we have accumulated over the years.  And with the help of an oven and mini muffin tins I will create new crayons, but keep in mind I have found that this only works with Crayola brand crayons as the other brands tend to be more waxy and will not color after melting. 
And then finally I am going to finish the dishcloth that I started last week.  This has been my first attempt at knitting, but I have really enjoyed it!  I don't know what it is about turning a ball of string into something useful but I have had a lot of fun learning!  Thanks Grandma!  I will post the completed project when I have that finished as well!  Wish me luck!

Aldi Deals 9/18 - 9/24

Here are some of the great deals this week at Aldi's!

8 oz. Mushrooms - $0.59 per pack
20 oz. Roma Tomatoes - $0.69 per pack
3 lb. bag Yellow Onions - $0.59 per lb.
14 oz. Green Peppers - $0.69 per pack
Priano Cheese Ravioli 25 oz. - $2.19
Edenvale Fresh Mozzarella 8 oz. - $2.69
Priano Fresh Stuffed Tortellini - $1.99
Priano Pesto Sauces - $1.99
Kirkwood Chicken Tenderloins - $5.99
8" Mum in Bushel Basket - $4.99

Friday, September 16, 2011

Groopdealz Anniversary Deal!

Today  Groopdealz turns 1 year old today and by celebrating they are offering 2 sets of Fancy Mum earrings for FREE!  If you aren't familiar with Groopdealz, it's very similar to Groupon, but instead typically offer great deals on handmade things, kits to make crafts, and jewelry!  CHECK IT OUT!

Thursday, September 15, 2011

Ready for Fall!

Lately I have been trying to be a "good" little crafter and getting all my unfinished projects done that I have bought and never started!  Today I finished a wooden pumpkin that literally been unfinished for 2 years.  I know, I am terrible, and with all the things I should accomplish I only really accomplish about half of them. 

I went and purchased an unfinished wooden pumpkin sign from Jo-Ann's for about $2 (on sale of course!) and decided that I could do something with it for that price.  So I decided to paint it, which I used some old craft paints that I found laying around in my pile of stuff and used the artist chalks to add the lines on the pumpkin.
WELCOME and made a Scarecrow using my "Paper Doll Dressup" cartridge. The end result was really cute! The pumpkin came with some straw ribbon which was kind of ugly, so I had some
leftover scrapbook ribbon and added that instead!
The end result was really cute! The pumpkin came with some straw ribbon which was kind of ugly, so I had some leftover scrapbook ribbon and added that instead!

Sunday, September 11, 2011

When life gives you lemons...

Today as I was browsing my favorite crafty blogs I came across this SUPER cute sign at The Crafty Scientist made with an artist's canvas and some free printable and templates.  I have had an artist canvas laying around from a previous project that I was going to make and nixed, so to re-purpose it I thought about trying out this fund project.  Now, I need to perfect my painting (which is not my best, since I am by far no artist), but I do have plans to make another one to see if I can do better than my first and add some additional ideas that I had!  After I painted the the canvas I painted the quote over with Modge Podge and then continued to cover the entire canvas as well.


Saturday, September 10, 2011

Isabelle's Pinkatastic Birthday Party!

Today was my daughter Isabelle's 4th birthday, and this year we went with the theme of Pinkalicious.  Now, those of you that don't have girls, the book (which is one of her all time favorites) is about a little girl that eats so many pink cupcakes that she turns pink.  I have to admit, it's probably one of my favorite books that I have read to her as well.  So going with the theme of the book, we totally pinked out her party and looking back at the photo's, we rocked it! 


I have posted some of the things I had already completed for her party.  The cupcakes were super fun, I made 3 different sizes and the largest ones looked just like they were taken out of the pages of the book.  I also made the 4 with my cricut and used a wand out of a 6 pack of party favor's I found at Wal-mart $2.  I think it turned out pretty darn cute, and the cake stand was borrowed, so all together her cupcake tier was pretty and inexpensive!

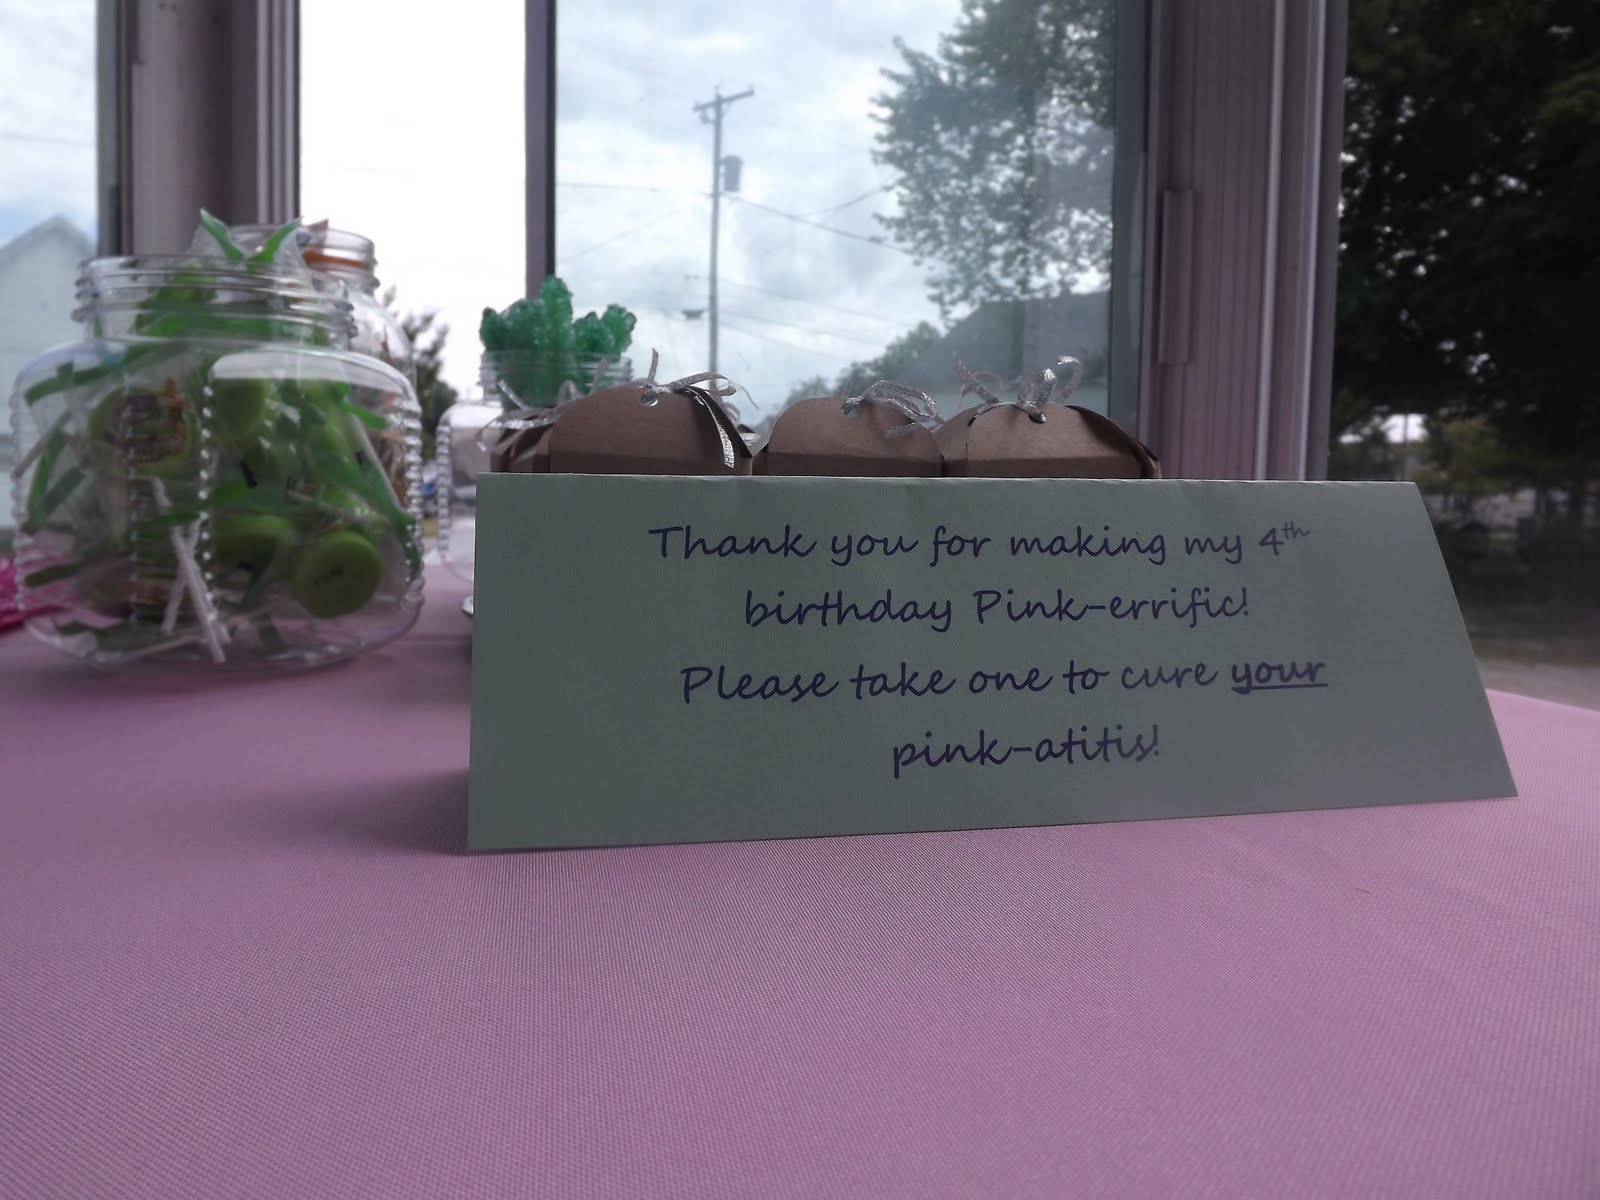
Also, I printed signs from the computer for the favors and to label the Pink-atastic Pink Lemonade.

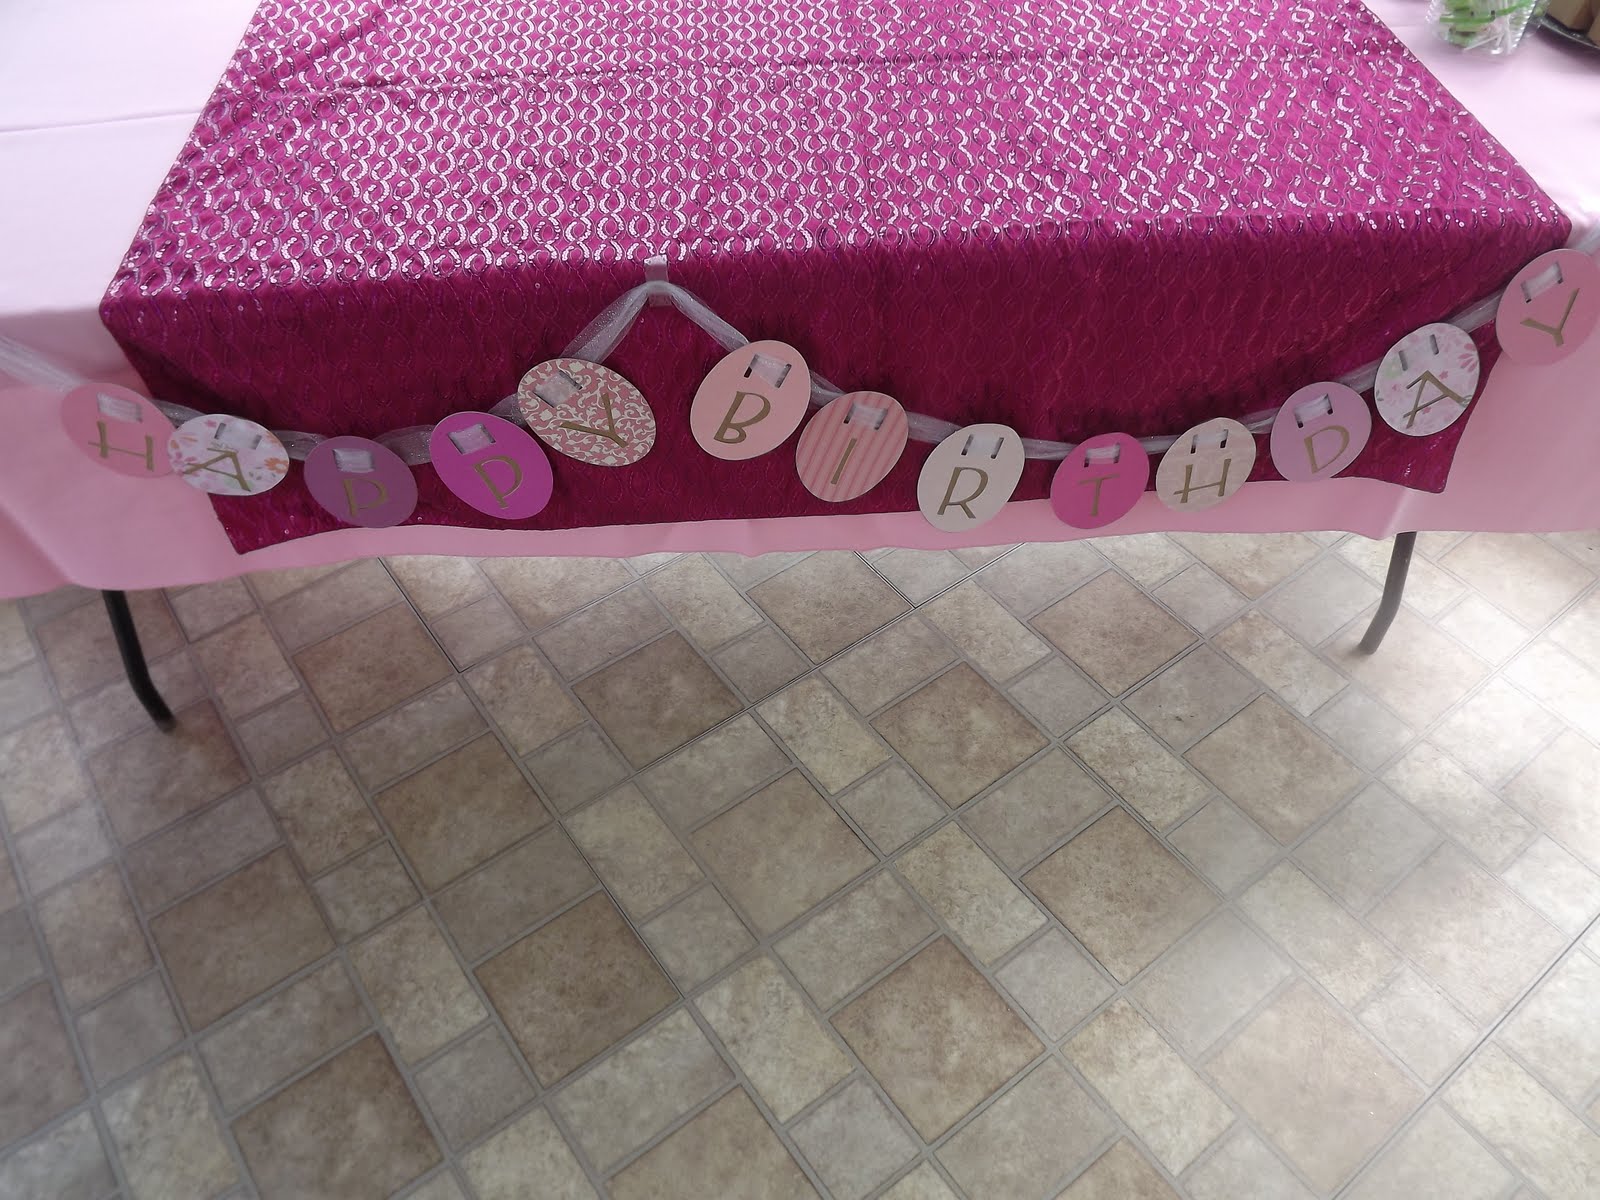
I also made a banner with my cricut George cartridge and had some leftover tulle from Isabelle's Preschool bag (from a previous post) and used it as the ribbon to hang my banner.
This was a pretty fun party and Isabelle had a great time as well did all of our guests.  The end result was very Pinkalicious!


Wednesday, September 7, 2011

Right @ Home 3 Weeks of Giveaways!

If everyone has not yet signed up for a Right @ Home account you definitely need to.  For the next three weeks they are giving away products for all members (as long as supplies last).  This weeks giveaway is a Scrubbing Bubbles gift pack which will be mailed out on 11/1/2011.  This site also offers great cost-saving cleaning ideas, organizing, and coupons.  Click the link above to go directly to the offers page.

Vinyl Pumpkin Decals @ Groopdealz

Today at Groopdealz they are offering decals for your Halloween pumpkins for $3!  Now, even though this is a great deal, I am going to try and mimic this with my own Cricut and see what I can come up with.  This is a great idea for those with toddlers that can't quite carve a pumpkin yet, but want to participate in the Halloween festivities!  If you would like to join GroopDealz click the link and sign up!  It is totally FREE and has great deals every day!

Sunday, September 4, 2011

House Party

Not sure if you are all aware of the incredible website Houseparty.com. It is a hosting website that allows you to apply to be a host for companies that are trying to push out new products in the consumer market.  I was picked (as some of you may know) as a host for the Little Debbie Cloud Cakes and they sent me a HUGE box of goodies to host my party.  Right now they are taking applications for Sabra and PlayStation.  It's totally FREE to join and if you are selected as a host you are not required to pay a single RED CENT for your products!

Meijer Labor Day 2 day sale

Here are some deals only good through tomorrow 9/5

Bi-color Sweet Corn - $0.18 each
Meijer White Hamburger or Hot Dog buns - $0.99

Gain Liquid Laundry Detergent - $3.99
$1/1 Gain Detergent, exp. 9/30/11 (RP 08/14/11)
Final Price - $2.99

Nature's Bounty, Ester C, Disney, or Flex-a-min Vitamins - B1G1
$1/1 Disney or Marvel Vitamin Product, exp. 10/12/11 (RP 08/28/11)
$1/1 Disney Vitamin, exp. 9/20/11 (RP 08/07/11)
Final Price - $1.75 each (approximate if pricing on website is accurate)


Saturday, September 3, 2011

Cupcake invites

So the next several posts will undoubtedly be about working on Isabelle's 4th birthday party.  I have tried to think of fun ways to give her a great party without it being overly pricey!  This includes having a great birthday invitation to let everyone know how fabulous your party will be!  Again, with the assistance of my cricut I created a great little cupcake shaped birthday invite and had fun creating them all using different left-overs from my scrapbook "scrap paper" pile.


I still have yet to perfect my handwriting to where I am happy with it, but for now it served its purpose!

Isabelle's Preschool bag!


So, Tuesday will be my daughter Isabelle's first day of Preschool.  Even though I am not ready to come to terms that my little girl will be going to school, she on the other hand is definitely ready.  The school supplies us with a canvas tote for her to carry as her school bag and with the help of a hot glue gun and my cricut, I finished it and it looks awesome!

She started dance this year so I thought decorating it with some tulle, dyeing it pink, and adding her name with the help of my Cricut.  This was a great way to add a little pizazz to a boring white tote bag!

I found a fun pink gerber daisy for an added touch and cut out the letters with my Cricut.  I will post later on cutting fabric with your cricut soon.

Tissue Paper Flowers


So, this year my daughter turns 4, and for her birthday party this year we are celebrating it Pinkalicious style!  Here is one of the projects I completed (with the help of my 10 yr. old, who actually did most of the work). 

Using a large mixing bowl, I traced tissue paper into large circles.  Then, with green pipe cleaner I poked it through the center of the tissue paper circles and then scrunched them to make flowers.  I used all pink to go with the theme of the party, but any color would be beautiful!  I even added some tissue paper with sparkle on it which added a nice touch. 

After arranging my "flower's" in vases, I added a ribbon which added a little extra!  These were super easy and my 10 yr. old really liked helping me make them!